Designing a sticker looks simple — until you send your artwork to the printer and get back something that doesn’t match what you expected. Blurry prints, white borders where there shouldn’t be any, colours that look different from your screen, or text cut off at the edges.
Most of these problems come from small file setup mistakes that are easy to fix once you know about them. This guide walks you through the full process of designing a print-ready sticker — from choosing your shape and size to submitting your file. No design degree needed.
Step 1: Decide Your Shape and Size
Before opening any design software, decide two things: what shape your sticker will be, and how big it needs to be.
Common Sticker Shapes
- Round / Circle — the most popular shape for product labels, seal stickers, and logo stickers. Clean and versatile.
- Oval — a slightly more premium feel than round. Popular for bottle labels and artisan food products.
- Square / Rectangle — straightforward and cost-effective. Works well for address labels, product info labels, and packaging stickers.
- Rounded rectangle — same as square but with soft corners. Feels modern and is less likely to peel at sharp edges.
- Custom die cut — the sticker is cut to follow the exact outline of your design. No rectangular border. Looks premium and stands out. You’ll need to provide a cut path (a vector outline showing where to cut) with your artwork.
Size Tips
- Measure the surface where the sticker will go. A 50mm round sticker looks great on a mailer bag but gets lost on a large box.
- For product labels, common sizes in Singapore are 30mm–80mm diameter (round) or 50mm x 30mm to 100mm x 70mm (rectangular).
- If your sticker has text, make sure it’s readable at your chosen size — print a test at actual size on regular paper before ordering.
Step 2: Set Up Your File Correctly
This is where most mistakes happen. Getting your file setup right from the start saves you time and reprinting costs.
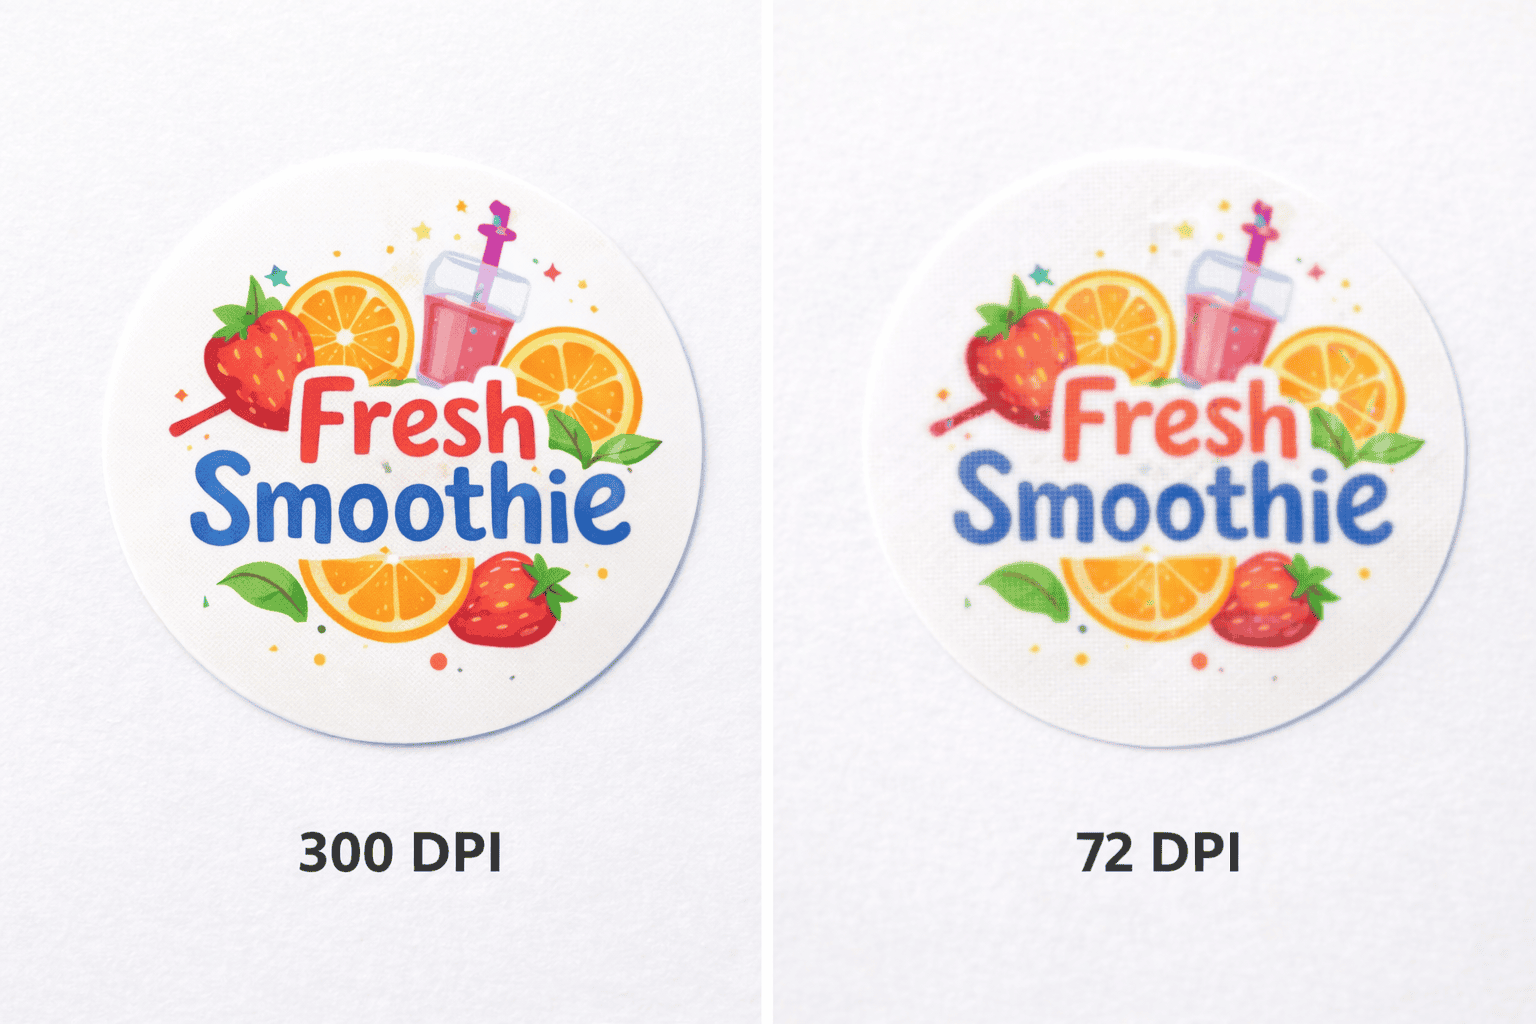
Resolution: 300 DPI Minimum
DPI stands for dots per inch — it determines how sharp your print will be. Set your file to 300 DPI (or higher) from the start. If you design at 72 DPI (which is the default for web images) and then try to scale it up, the result will be blurry and pixelated.
Rule of thumb: if you zoom into your design at 100% on screen and it looks crisp, it will print well. If it looks fuzzy on screen, it will look worse on paper.
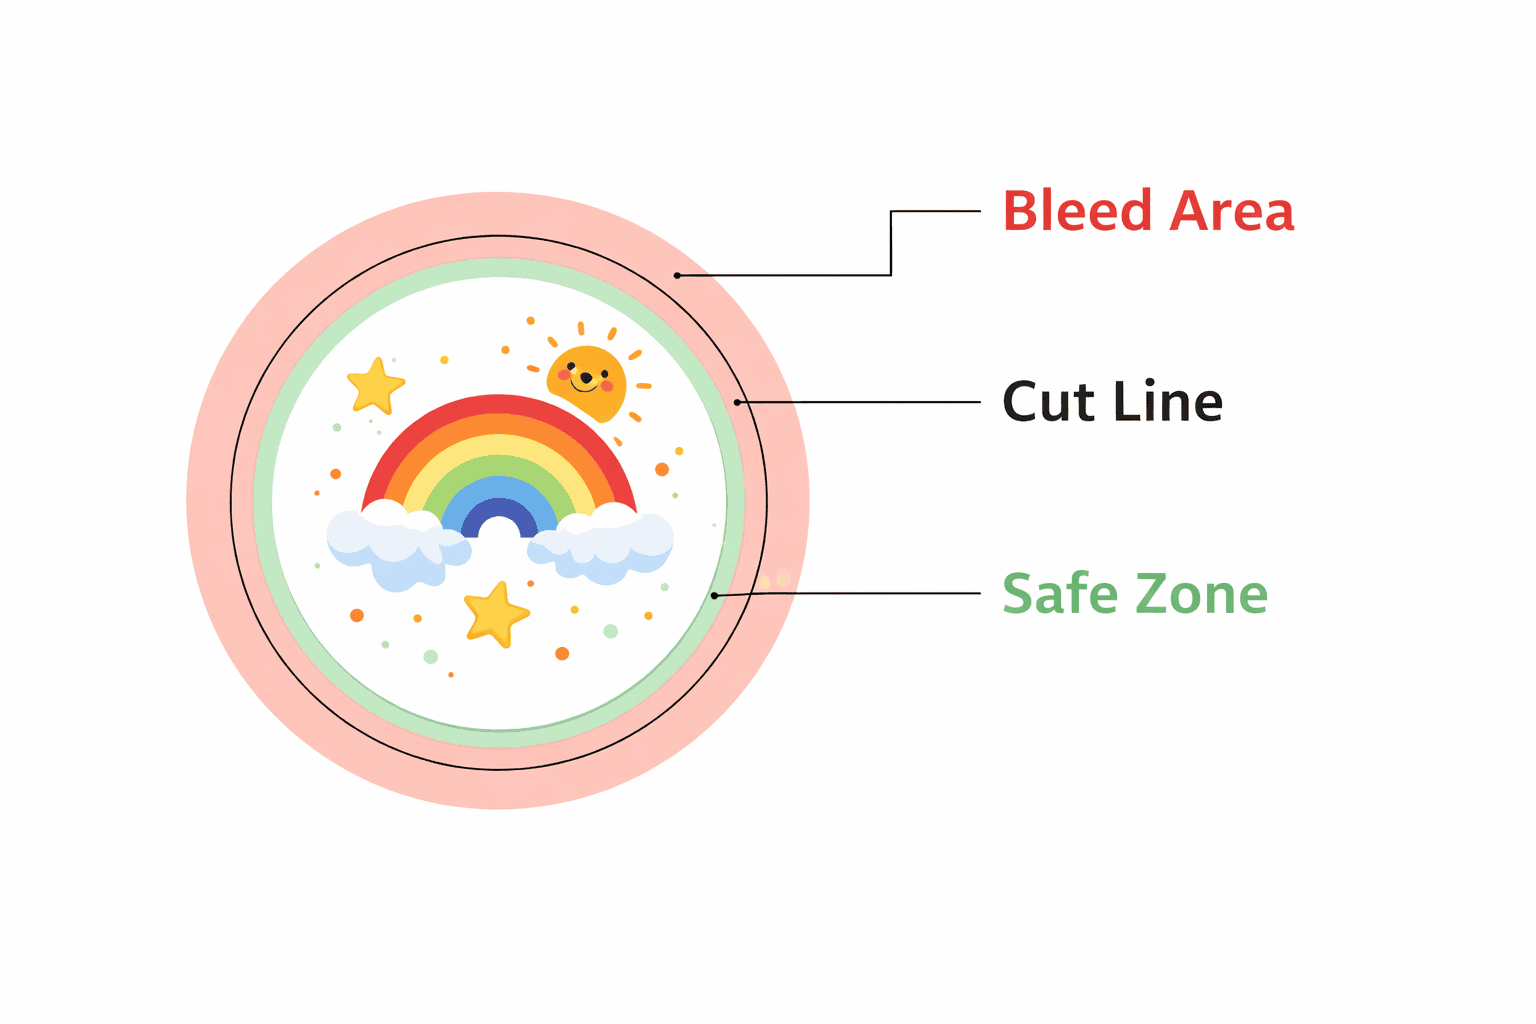
Bleed: Add 3mm on All Sides
Bleed is the extra area around your design that extends beyond the cut line. When stickers are cut by machine, there’s a small tolerance — if your design goes right to the edge with no bleed, you’ll end up with a thin white border on one or more sides.
Add 3mm of bleed on all sides. This means your background colour or image should extend 3mm past where the sticker will actually be cut. Most printers in Singapore use 3mm as the standard.
Safe Zone: Keep Important Content 3mm Inside
The opposite of bleed. Keep all important text, logos, and key design elements at least 3mm inside the cut line. This prevents anything important from being trimmed off during cutting.
Think of it as three layers:
- Bleed area (outer 3mm) — background extends here, will be trimmed off
- Cut line — where the sticker will actually be cut
- Safe zone (inner 3mm) — all text and important elements stay inside here
Colour Mode: CMYK, Not RGB
Your screen displays colours in RGB (red, green, blue). Printers use CMYK (cyan, magenta, yellow, black). If you design in RGB, some colours — especially bright blues, greens, and neon shades — will shift when converted to CMYK for printing.
Set your colour mode to CMYK before you start designing. In Canva, this is available on the paid plan. In Adobe Illustrator or Photoshop, you can set it when creating a new document.
Step 3: Choose Your Material
Your material choice affects how the sticker looks and performs. Here’s a quick overview:
- Mirrorkote (Glossy Paper) — affordable, vibrant. Best for indoor stickers, packaging, promos.
- Woodfree (Matte Paper) — writable surface, clean look. Best for address labels and forms.
- Synthetic PP — water resistant, tear resistant. Best for food labels, cosmetics, outdoor.
- Clear PP — transparent. Best for glass bottles and jars.
Not sure which one to pick? Read our full guide: Which Sticker Material Should You Choose? →
Step 4: Common Design Mistakes to Avoid
These are the most common issues we see when customers submit sticker artwork for printing at Orange Print:
1. Low Resolution Images
Using images from Google or screenshots from social media. These are typically 72 DPI and will print blurry. Always use original, high-resolution files.
2. No Bleed
Designing right up to the edge without extending the background past the cut line. This causes white edges on the finished sticker.
3. Text Too Close to the Edge
Placing important text or logo elements right next to the cut line. Even a 1mm shift during cutting can trim off part of a letter. Keep everything 3mm inside the cut line.
4. Text Too Small
Stickers are small. Text that looks fine on your computer screen can become unreadable when printed at 40mm x 30mm. As a general rule, avoid text smaller than 6pt on stickers. For body text, 8pt or larger is safer.
5. Using RGB Colours
Designing in RGB without converting to CMYK. Neon greens, electric blues, and bright purples will look different when printed. Design in CMYK from the start to avoid surprises.
6. No Cut Path for Die Cut Stickers
If you’re ordering custom-shaped (die cut) stickers, you need to include a cut path — a vector outline on a separate layer that shows the printer exactly where to cut. Without it, the printer has to guess, and the result may not match what you had in mind.
Step 5: Save and Submit Your File
Recommended File Formats
- PDF (PDF/X-1a) — the gold standard for print files. Preserves fonts, colours, and resolution exactly as you designed them. This is what most printers in Singapore prefer.
- AI (Adobe Illustrator) — native vector format. Great for logos and designs with clean lines.
- EPS — universal vector format. Widely accepted.
- PNG (300 DPI) — acceptable for simpler designs. Make sure the resolution is 300 DPI and the canvas size matches your sticker dimensions.
Before You Submit — Checklist
✅ Resolution set to 300 DPI or higher
✅ 3mm bleed added on all sides
✅ Important text and logos 3mm inside cut line
✅ Colour mode set to CMYK
✅ Fonts converted to outlines (if submitting AI/EPS)
✅ Cut path included on separate layer (for die cut stickers)
✅ File saved as PDF, AI, EPS, or high-res PNG
✅ 3mm bleed added on all sides
✅ Important text and logos 3mm inside cut line
✅ Colour mode set to CMYK
✅ Fonts converted to outlines (if submitting AI/EPS)
✅ Cut path included on separate layer (for die cut stickers)
✅ File saved as PDF, AI, EPS, or high-res PNG
What Happens After You Submit
- Artwork check — the printer reviews your file for resolution, bleed, and colour issues. If anything needs fixing, they’ll let you know.
- Proof approval — you receive a digital proof showing how your sticker will look. Check sizing, colour, and text carefully before approving.
- Printing — your stickers go to print. Standard turnaround in Singapore is 3–5 working days. Same day is available for urgent orders.
- Collection or delivery — self-collect or delivery across Singapore.
Frequently Asked Questions
What is the best file format for sticker printing?
PDF (PDF/X-1a standard) is the best format. It locks in your fonts, colours, and resolution so nothing shifts between your computer and the printer. AI and EPS are also good. For simpler designs, a 300 DPI PNG works too.
What resolution should my sticker design be?
300 DPI minimum. This ensures sharp, clear prints. Lower resolutions (72 DPI, 150 DPI) will appear blurry and pixelated when printed, especially on small stickers where details matter.
What is bleed and why do I need it for stickers?
Bleed is the extra 3mm of design that extends past the cut line. When stickers are machine-cut, there’s a small margin of movement. Without bleed, you’ll end up with uneven white edges. With bleed, the background extends past the cut, so even if the cut shifts slightly, the result still looks clean.
Can I use Canva to design stickers for printing?
Yes. Canva works for simple sticker designs. Use the paid plan if possible — it lets you export in CMYK and set custom dimensions. Set your canvas to the sticker size plus 3mm bleed on each side, use high-resolution images, and export as PDF (Print quality). For complex designs or die cut shapes, Adobe Illustrator gives you more control.
What is a cut path and do I need one?
A cut path is a vector outline that tells the printer exactly where to cut your sticker. You only need it for custom-shaped (die cut) stickers — where the sticker is cut to follow the shape of your design instead of a standard circle or rectangle. Place the cut path on a separate layer in your design file. If you’re not sure how to create one, most printers can do it for you.
Ready to Print Your Stickers?
You’ve designed your sticker, set up your file correctly, and chosen your material. Now it’s time to print.
Orange Print offers kiss cut and die cut sticker printing in Singapore — any shape, any material, no minimum order. Same-day turnaround available for urgent jobs.
Browse our sticker and label range →
Get a quote on WhatsApp → +65 8438 1313
Need help choosing your sticker material? Read our guide: Which Sticker Material Should You Choose? →